Preliminary information
Before we get to the heart of this tutorial, there is some information it is my duty to provide you with to enable you to create free Android app as well as possible.
First of all, I reiterate that, to develop applications for Android, you need to know the programming languages. In the specific case of the green robot operating system, the most common are Java e XML. For further information in this regard, I refer you to reading my guides on how to start programming, how to create a program, how to learn Java and how to program in Java.
The programming languages, once learned, can be used by means of special software useful for the development of apps. The instruments in question are primarily the SDK. Acronym of Software Development Kit, they are collections of official tools (made available by the companies that take care of the reference software platforms, in this case Google with Android) for developing and testing apps. They allow you to make the most of the platform to which they are addressed and to manage it in a very detailed way.
Then there are the independent commercial software, that is to say those that, as can be understood from the definition itself, have been created by third-party companies and allow you to create content within an integrated environment. Usually, they are easier to use than SDKs and allow you to structure a single project that can be exported in different formats, as a package compatible with various platforms, based on the license in your possession.
Software to create free Android app
As I told you in the previous lines, to take advantage of the programming languages to create free Android apps it is necessary to resort to the use of special software: below you will find those that, in my humble opinion, represent the best in the category. Put them to the test now!
Android Studio (Windows / macOS)
Android Studio is the tool made officially available by Google for the development of apps for Android. It is free, can be used on Windows and macOS and includes everything you need to perform the operation described in this tutorial and to test the applications created.
To download it, go to the program's website and click on the button Download Android Studio placed in the center. Then select the item I have read and agree with the above terms and conditions in the form that is shown to you and click on blue button, located at the bottom, to start the download
Completed the download procedure, if what you are using is a Windows, april il .exe file ottenuto e, nella finestra che compare sul desktop, clic sui pulsanti Yes, Next (three times in a row) e Finish.
Stai using MacOS, april il package .dmg scaricato, trascina l 'android studio icon in the folder Applications on your Mac, right-click on it and select the item apri from the menu that appears, to start Android Studio going around the limitations imposed by Apple on applications from non-certified developers (an operation that must be carried out only at the first start).
Now that you see the software window on the screen, click on the buttons OK e Next (three times), wait for the download of the components needed to use Android Studio to complete and click on the button Finish.
Now that you see the main screen of Android Studio, feel free to try your hand at developing your first app by selecting the option Start a new Android Studio project, then choose the module you want to start from, assign a name to the app and select the version of the SDK to use.
Next, click on your button Next and indicate which preset base you want to use, configure the values (if you want, you can also leave the default ones) and, finally, click on the button Finish.
Therefore, customize the model chosen for your app using the program editor: on the left you will find the structure, on the right the actual editor and at the top there are the buttons to insert objects, paste the code parts etc. and the menu bar.
When you want, you can save the project of your application by clicking on the item Fillet, which is located at the top left, and selecting the appropriate wording from the menu that appears.
Eclipse IDE (Windows / macOS / Linux)
Another resource that I invite you to consider is Eclipse IDE: it is a free software, available for Windows, macOS and Linux and thanks to which it is possible to compile applications based on Java. Using it in conjunction with the free add-on Android Development Tools it can be used for the development of applications for the Google mobile platform. Note that, in turn, it needs Java to be installed on the PC to work.
To download it, go to the Eclipse website and click on the button first Download 64 bit e poi quello Download, present in the new page displayed.
Ultimato il download, se stai using Windows, extract theZIP archive just got into a folder of your choice and launch the software Eclipse present inside. Then click on the buttons Yes e OK in the window that appears on the desktop.
Instead, if you are using MacOS, april il package .dmg ottenuto e trascina l 'program icon in the folder Applications Mac. Next, right-click on it and select the entry apri from the menu that appears, so as to open Eclipse, however, going around the limitations imposed by Apple on applications from non-certified developers (an operation that must be carried out only at the first start).
Wait, now, for the software to download and run, click on "X" that you find next to the item Welcome in the window that opened and installs Android Development Tools: to do this, click on the item Help located at the top left, select the wording Install New Software from the menu that appears, type the address http://dl-ssl.google.com/android/eclipse/ in the empty field attached to the displayed window and click on the button Add. At this point, check the box to install the component Developer Toolsclick on your bottone Next and accepts the relative license of use.
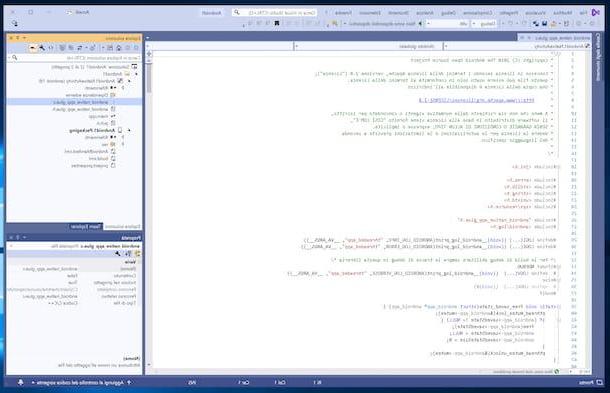
Once this is done, you can try your hand at developing your first application using the Eclipse editor: on the left you will find the list of all the projects, at the bottom there is the tab bar through which you can get information on what you are programming and on the right you can view all members of the selected class.
To start working on a project, click on the item Fillet located in the upper left part of the Eclipse window, select the items New e Java Project, fill in the field Project name typing the name you want to assign to your project and press the button Finish.
When you see fit, you can save your work by clicking on the menu again Fillet, selecting the item Save Ad from the latter, specifying the location and name you want to assign to the output file and clicking the button OK.
Visual Studio (Windows / macOS)
Another great tool to which, in my opinion, you would do well to appeal to create free Android apps is Visual Studio. If you have never heard of it, it is a program made available by Microsoft, compatible with both Windows and macOS and thanks to which you can develop applications for all the most popular platforms, both mobile and not, using different programming languages .
To download it to your PC, visit the Visual Studio website and click on the button Download che trovi in corrispondenza della voce Community.
Completed the download process, if you are using Windows, open the .exe file obtained, press on the buttons Yes e Continue and wait for the program to be installed. Once the procedure is complete, locate the section Mobile devices and games, check the box next to the programming language you intend to use (eg. Mobile application development with C ++) and click on your button Install.
Su MacOSInstead, open the package .dmg obtained, double-click theprogram installer icon and, in the window that opens, click on the button Continue. Once this is done, check the box next to the wording Android, to install the component needed to develop apps for Android and press the button Install.
At this point, if you have a Visual Studio account, log in via the latter. If not, select the link to skip this step and follow the initial setup procedure that is proposed to you.
Then click on the button Start Visual Studio, select the voice Create a new project, choose one of the preset templates available to start developing your app and press the button NEXT. Then assign a name to the project, indicate the path where you want to save everything and the name you want to assign to the container and press the button Crea.
Subsequently, you will find yourself in front of the program editor with the sections on the right to view the structure of the project and the properties of the various elements added; in the center the section showing the code parts and at the top the toolbar and the menu bar with all the buttons and functions useful for creating and modifying the app.
When you want, you can save the application you have developed, in the path indicated during the creation of the project, by clicking on the item Fillet which is at the top left and on the wording Save [project name], present in the menu that opens.
Come creare free Android app online
Creating apps for Android is also feasible online, without having to download absolutely anything on your computer, acting directly and comfortably from the window of any web browser. How? Simple: just contact MIT App Inventor.
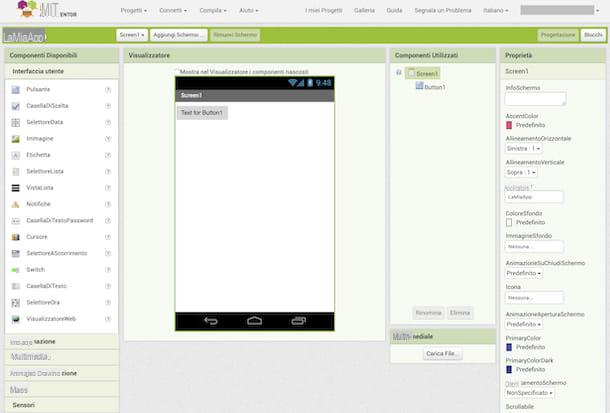
MIT App Inventor is a free online service, thanks to which it is possible to create apps for Android in a fairly simple way and without necessarily having to deepen the study of programming languages. Compared to the resources I told you about earlier, it is a bit more limited, but still very good solution.
You ask me how you can use it? I'll explain it to you right away. To begin with, go to the home page of the service, log in with your Google account (it is essential to be able to use MIT App Inventor) and click on the button Start new project, which is located at the top. Once this is done, type the name you want to assign to the app you want to create and click on the button OK.
Now that you see the service editor, translate its interface by selecting thecityno from the drop-down menu located at the top right. Then, start trying your hand at creating your app using the tools and commands available on the screen: on the left you will find the list of elements and objects that you can add to the application interface, in the center you will find the screen through which to display the app in preview, while on the right there is the list of elements that compose it, the menu with the properties of the selected objects and the button to upload media files.
To add elements to the app interface, simply select them from the list on the left and drag them to the screen in the center. If you want, you can also change the properties of a certain element by selecting it and using the items and options you find in the section on the right.
To add more screens to the application, instead, click on the button Add Screen which is located at the top, while to remove them, in case of second thoughts, press the button Remove Screen adjacent.
When you see fit, you can save the application project created by selecting the menu Projects, which is located at the top left, and clicking on the wording Save. To download it to your PC, instead, choose the option Export the selected project (.aia) to my computer, always attached to the menu Projects.
How to make free Android apps and make money

You have followed my instructions on how to create free Android apps and now you'd like to understand how to distribute them on Play Store e earn thanks to them? To do this, you must first create a account as a developer and associate yours with it Google account, paying 25 $.
To carry out the operation in question, connected to this Web page and register on Google Play Console. So, log in with your Google account or check that the one you are currently using is correct (if not, click on the link Log in with another account and modify it), check the box under the heading I accept the developer agreement, click here Go to payment which is located below, enter your credit card information for payment and, finally, provide the details to create your developer account.
Then, send the applications you have developed to Google, uploading the relevant ones APK file. Also manage them metadata (i.e. versioning and system requirements) and the commercial part (hence the title, description etc.).
As for the ability to make money with your apps, you can either choose to make them available only through purchase, upon payment of a given sum of money, which free of charge, however, by inserting it inside the advertising banners and thus going to raise money in this way. Another system you can evaluate is to propose in-app purchases. In this case, users are invited to purchase additional features and / or content following the download. For more details, I refer you to the consultation of the official Play Console guide.
How to create free android apps