Index:
- Animoto (Online)
- PhotoStage Slideshow (Windows / macOS)
- Adobe Spark Video (Online / iOS)
- Kizoa (Online)
Animoto (Online)
Among the many online programs and tools that you can use to create presentations with photos and videos, I recommend that you take a look at Animoto. This online tool allows you to import your images, adding text and music, so as to create videos to save on your computer or share on your social networks.
This service is however a payment, but you can create an account free to start using the evaluation version. If you are interested in testing its features, please click this link, which takes you to the official Animoto website.
Once you have reached the website I have provided you with, click on the button above Sign up to register an account free. Then enter the information on the screen and click on the button Start trial.
Once the account has been created, you will be directed to a page that will allow you to select the type of project to create. You can choose between Animoto memories e Animoto Marketing. The difference between the two plans lies in the additional features: if you own the Marketing there is the possibility of making videos in Full HD and also accessing many other contents that can be used for the creation of projects.
In this guide I will show you the features of Animoto memories, as I believe it is the most suitable tool for creating videos that can be shared on social networks. Once you have selected the menu item Animoto memories then click the button Create.
Then select a style from those that will be proposed to you, which are also divided by category. You will also be able to view a preview video that shows you an example of a video made with that theme. When you are sure which theme you want to use, click the button Create videos.
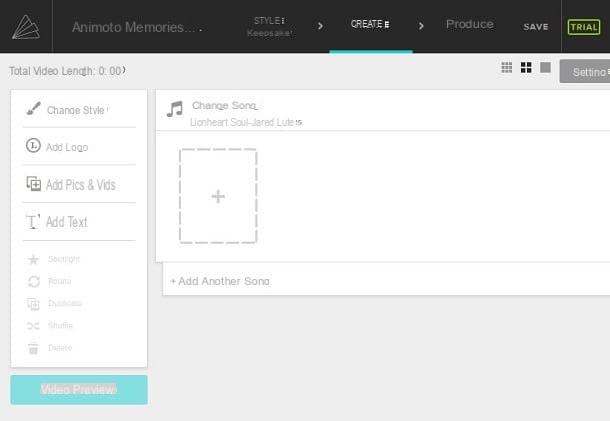
Now wait for the project to load and decide whether to display (Home) or skip the tutorial (Skip). Animoto's interface is very simple: on the left you will find all the tools to add photos (Add pics & vids), the lyrics (Add text) or logos (Add logo). You can also change the theme you initially set up - just click Change style.
If you want to add or change the music track, click on the wording above Change song. You can select a piece of music from those proposed or possibly upload your own audio track.
When you're done, click the button on the left Preview video to generate a preview of your project. If the video requires further editing, click Continue editing, otherwise export it by clicking . You will then need to enter information on the screen, such as the title of the video and its quality. Once you have carried out the operations indicated by me, then complete the procedure by clicking on the button Finish.
PhotoStage Slideshow (Windows / macOS)
For Windows and macOS operating systems you can install software for creating videos with fully customizable photos, music and text. The software in question is called PhotoStage Slideshow and it is available for free, when used for non-commercial purposes. If you want to use this program for different purposes, then you will need to purchase a license, which will also give you access to some additional features.
If you are still interested in using it, click this link to connect to the official website of the software and download the version free in order to start creating your videos.
Once you have reached the website that I have indicated, you will have to scroll down the page, so as to view all the download links, based on the platform you are using at the moment. In this guide I will cover software installation on the Windows platform. Then click Download for Windows, under the section Download PhotoStage Slideshow Creator Software.
Once the installation file has been downloaded and launched, click the button Yes and select your language cityno. Then select the option I accept the license conditions and finish the installation by clicking on NEXT.
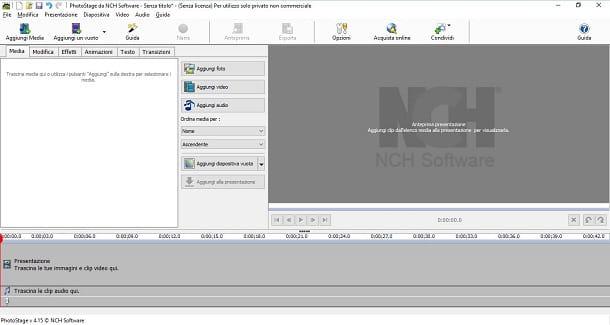
Now you simply have to open the program, via its icon and add all the photos you want to insert in your project, via the button Aggiungi photo. In the file browser on your computer, select all the photos you want to include in your video and click apri. Once the upload is complete, you will find all the imported photos in the tab Media, which you find in the left section.
To add music to your video instead, you will need to click the button Add Audio and select the files from your computer that you want to insert into the project. Then click apri to start the import. These last files will also be available in the tab Media.
Then drag all the photos into the timeline at the bottom, including the music files; then sorts the position of the photos, moving them on the timeline. Now you just have to add some texts on the various slides. You will find options that will allow you to do this if you click on the tab Text.
Furthermore, if you also want to add custom effects, you can use the contents made available in the tab Animations, Effects e Transitions.
Have you customized your video and now think it's ready? Very well! Using the player on the right side, you can see a preview of your project. At this point, if you are satisfied with the work, click on the button above Export.
Adobe Spark Video (Online / iOS)
If instead of a software that can be installed on your computer, you want to orient yourself on a completely online solution, then you can rely on Adobe spark video. This tool is completely free and you can, in addition to using it via the official website, download the application available on the iOS App Store.
Is the question of interest to you? Alright, then head over to the website I provided you and click the button above Start now for free and get started by first creating a new Adobe account. If you already have one, then simply click on the entry Login.
After logging in, click the button with a symbol of a [+] in the center of the screen and then click on the item Video, to start creating a new project.
The first parameter you will need to enter is the title of the project: then type one of your own and click on Next. Then select one of the available themes by clicking on the wording Pick this one, based on the theme you like best. You can also opt to start a blank project by simply clicking Start from scratch.
A small tutorial will then start which will quickly explain how to use Adobe Spark Video. At this point I recommend that you view it to better understand how this simple but powerful online tool works.
Returning to the Adobe Spark explanation, below you will see a series of slides, which you can delete, duplicate or add others. For the latter function, just click on the slide located on the left that presents the symbol [+] in the center. For the other functions, however, just click on theicon with three dots that you find on each slide and select the items that will serve your purpose.
At this point, to add text or images to the slides, click on an empty one; as you can see, items will appear for you to insert content into the slide. In fact, you can add images from your computer or from the Adobe database or even add texts. Then use the tab Music che you find above, to add a music track from the Adobe database or from your computer.
At the end of the customization, or whenever you want, you can view a preview of your project: just click on the button Preview.
If, on the other hand, you are satisfied with your work and want to export the movie, click on the button Share, pto share it on your social networks, or on Download, so you can keep it on your computer.
Kizoa (Online)
Another service that is certainly very useful for the purpose you have proposed is Kizoa: this online tool allows you to create presentation videos with photos, music and even texts.
To use it you will not have to download any software but only register an account free. Another requirement is Adobe Flash Player, which should already be installed on your PC via your browser; if this is not the case, however, you will have to install it (via this link) or enable it by following the instructions you see on the screen when prompted by the browser.
If you are curious to try this service then reach it now via its website. Then click the button above Subscribe, to register an account free. Then enter all the data that will be requested and check the box below to accept the terms of service. Finish the procedure by clicking on the button sign up for free.
Once you have completed the account registration procedure on Kizoa, a panel will open for you to create your video project. Then click the button above Create slideshow and then select one of the two modes: you can select one of the many predefined templates available (Kizoa models) or create a new empty project (Free creation). By selecting the latter option, you will also need to adjust some video settings.
Using a predefined theme instead, will make Kizoa guide you at every step, in order to help you in the automatic creation of your video.
To create videos with photos, music and writings, using Kizoa, you will have to import all the photos to be inserted into the project, including the music files that will accompany the presentation of the movie.
Keep in mind that you will need to sort them on the timeline, in case you have opted for the Free creation. In this mode, you can also add custom effects, such as transitions and animations. Don't forget to add additional music tracks and lyrics to your video. You will find all these features via the toolbar at the top.
Want to preview the video you created? Click the button Try. If the project you have created is to your liking then you just have to click on To save.
How to create videos with photos and music and text