How to record audio from PC
The device you want to use to make your recordings is a PC? Very good! In the following paragraphs I'll show you how to get perfectly audible recordings, with clear and clean sounds, in a simple way. To do this, you can rely on both the default solutions of Windows e MacOS that ad third-party applications. Which? Find everything explained below.
How to record audio on Windows
The first application I want to show you is the Voice recorder that you can find already installed inside your computer Windows. Being an application integrated in the system, you will only need to search for it among those present on the PC.
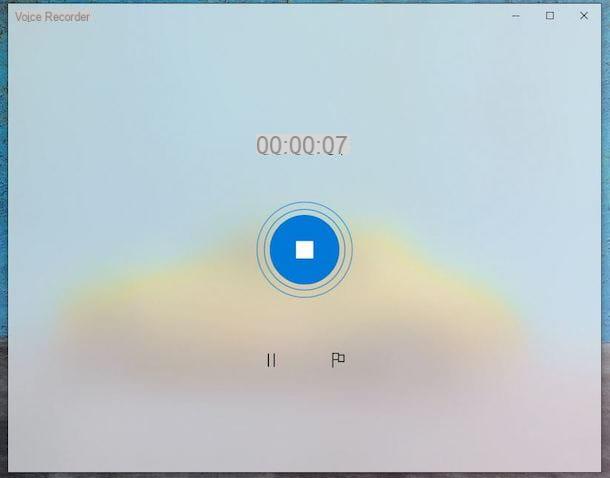
To search, write "Voice recorder" in search bar (located in the taskbar at the bottom or in the Start menu) and click on the item apri. Once this is done, press the button Yes, to allow the voice recorder to access the microphone (if necessary). In the new window that has opened, then click on the button Rec (with a microphone image) to start recording.
Once registration has started, you can decide to stop it permanently by clicking on the button Stop (the blue button), or to pause it (and then resume it from the exact point where you stopped it), by clicking on the button Pause registration (to restart it you have to click this button again). Instead, by hitting the button Add a highlighter (the one with the flag) a bookmark will be added to mark a specific part of the recording that you will be able to see, at the exact point, after recording is finished.
Did you record your first audio? Good! Now, through the new application screen, you can listen to it again and make changes. By clicking on the button Size you can cut pieces of recording simply by moving the two black cursors and then clicking on the button Save, decide if update the original copy o save a copy of the file. Instead, clicking on the button Rhinomine you will be able to rename your registration. In addition to this, you can also decide to share or delete it by clicking on the relevant buttons.
Last, but not least, by clicking on the button View other info (the three dots) you can select the item Open file path to access the folder where the recordings are saved. Alternatively, you can find them manually by opening theFile Explorer (the yellow folder icon in the bottom menu) and following the path Documents> Recording Sounds. The files are saved in .m4a.
How to Record Audio on Mac
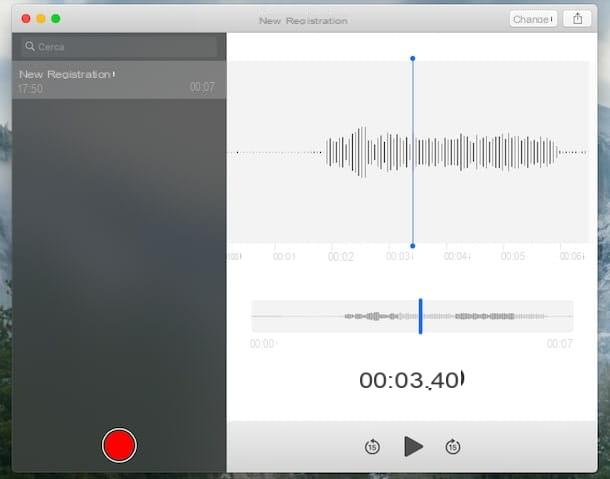
I use a Mac? Then, to record your audios, you can use Vocal Memo: an application integrated into the macOS operating system designed to easily record voice notes through the computer's internal microphone or any external microphone.
To open it, go to Launchpad (the rocket icon on the Dock bar) and click on its icon, then press the button Continue (if you see the welcome message) and choose whether to enable the use of position and syncing your voice memos to iCloud (I recommend no for the first request and yes for the second).
Now you just have to start your first registration. To proceed, click on the button Rec (the red circle). Later, if you want to stop recording temporarily, click on the button Pause (the two red bars); if you want to end the recording, click on the button end. In the left part of the window will appear thelist of recordings as you make new ones.
Once you have finished recording, in the new screen that opens, you can listen to your recording again by clicking on the ▶ ︎ button or modify it by pressing the button Modification, located in the upper right corner. The editing options allow you to replace, cut o eliminate a piece of recording.
To replace, i.e. overwrite a portion of the recording with new audio, place the playhead (the blue line that runs along the recording wave) at the exact point where you want the overwriting of the audio to begin. Now press the button Replace to record over the selected part. When you are done, click on the button Stop e poi quello end.
To cut or delete a piece of the recording, instead, click on the button Size (the rectangle in the upper right corner) and, finally, move the yellow head left and right by setting the ends of the section you want to cut. Now you just have to press the button Size or on Delete, finally on Save.
If you want to delete all the registration directly, select it from the list, right click and select the item Delete from the context menu. To rename it, click on its instead name, delete the text and write the name you want. Finally, to move your recording, select it from the list, press and hold the left click and drag it to the Desk or in one Finder folder. The files are saved in .m4a.
How to record audio with Audacity

The last PC solution I want to offer you is Audacity, one of the best free and open source audio editing programs, available for Windows, MacOS e Linux. Don't be scared, this is nothing too complicated, Audacity is also suitable for beginners. Its interface is intuitive and completely in your language. Do you want to try it? Well, then just follow what I'm about to tell you.
First, download the program by connecting to its official website and clicking on the button first Audacity Download and then, if you use a PC Windows, on the item Audacity For Windows. Then click on the link Audacity xxx installer, then up Audacity Windows installer And that's it.
Once the download is complete, open the .exe file obtained, click on the button Yes to allow the app to make changes on your device, select the language I awarded her OK. Click for your NEXT four times and up Install. Wait a few seconds, then press on again NEXT and end, to conclude the setup. Audacity will open automatically.
If you use a Mac, instead proceed in this way: connect to the official Audacity website and click on the button Audacity Download. Now press the button Audacity for macOS; in the new page opened, click on the link Audacity xxx .dmg file and then Audacity macOS dmg, to download the .dmg file to install the program.
Once the download is complete, open the .dmg file downloaded and drag the program icon into the folder Applications. Done? Very well. Now you just have to open Audacity by acting through the Launchpad or by looking for the icon in the folder Applications. Then click on the button Allow (to authorize the opening of software that does not come from certified developers, an operation necessary only at the first start).
You are now ready to start using Audacity. The first thing to do is to choose the right microphone. Then click on the drop-down menu corresponding to the icon of microphone e scegli l'opzione Integrated microphone to record sounds external to the computer, such as vocals. The program for Windows, unlike the one for Mac, also offers the possibility to record the sounds played by the computer, by selecting the item Microsoft Sound Mapper from the same menu.
You just have to start the registration by clicking on the button Rec (the red dot). You can decide to pause it by clicking on the button Pause (the two lines), or terminate it by clicking on the button Stop (the square). To save your recording, select the entry instead Fillet from the menu at the top left, select the item Export audio from the latter, type a name to assign to the file, choose the format output (eg MP3), the destination folder and click Save. If you want, in the new window, enter i metadata tag and press pulsating OK.
Audacity offers tons of other features to edit and enhance your recordings. If you want to learn how to cut pieces of audio, change the speed, quality or adjust the volume, I recommend my guide on how to use Audacity where you will find all the useful information in this regard.
How to record audio from the phone
For convenience, you have chosen to make your audio recordings from smartphone or tablet? No problem - there are tons of solutions you can use on both Android that of iPhone / iPad. You will easily succeed in your intent and you will be able to get excellent recording even through these devices. Do you want to find out how? Well, then read on and you'll find out how to record audio through your mobile devices.
How to Record Audio on Android
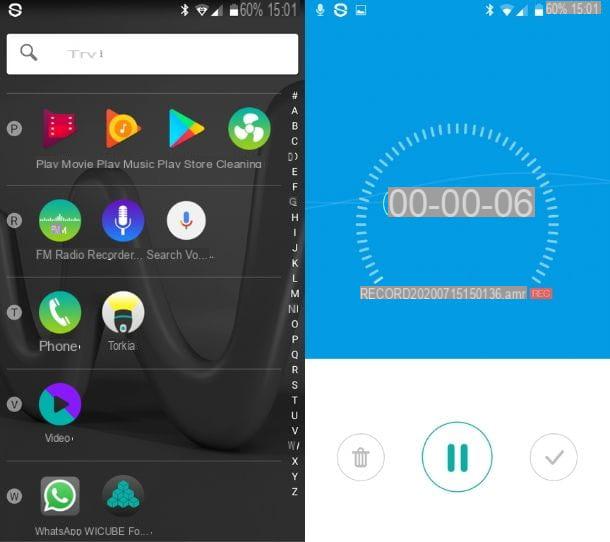
A device was used Android, this is likely to have a Integrated voice recorder. To find it, go to the Home screen or in app drawer and check among the available icons and folders.
Once located (the name may vary depending on the brand and model) tap on it and open it. Via the button Rec, the central one, you can start recording and stop it by tapping the button Pause (the two lines). To definitively end the registration, click on Stop (usually represented by a square or a check mark). The file will be automatically saved on the device.
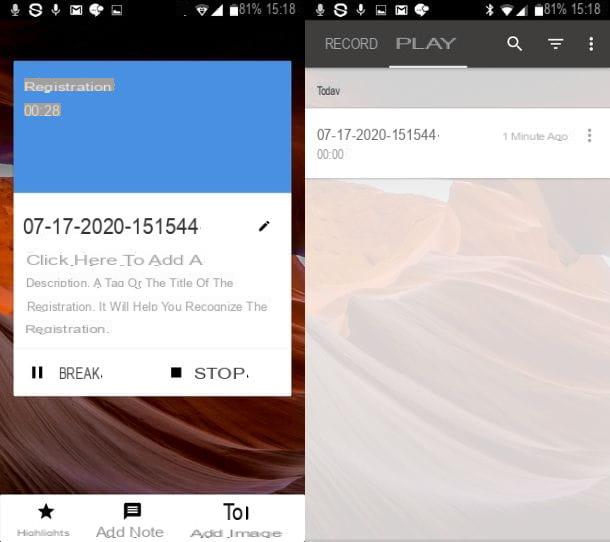
Does your device not have a built-in recorder? Then I can recommend one of the most popular Android apps. It is about Triveous Voice Recorder, available as a free version on the Google Play Store and on alternative stores. One is then available PRO version (from 4,99 euros per month or 19,99 euros per year).
In the free version, the app allows you to record in experimental m4a format, add notes and images, and make some changes such as noise and echo cancellation. The paid version, on the other hand, offers additional features such asstorage in the Skyro Cloud synchronization between devices, sharing the recording such as link and support.
After downloading and installing the application on your device, open it by tapping on its icon. To start a recording, click on the icon microphone placed at the bottom. To activate other advanced functions, click on the button menu (the three dots) and select the item Settings from the pop-up menu. In the new screen that opens, select the item Core Audio to change the parameters.
How to Record Audio on iPhone

I use a iPhone? Then I am happy to inform you that, installed directly on the device, there is the app Vocal Memo, the same one available on the Mac. Its operation is almost identical.
To use it, log in to yours Home screen and tap on the icon Vocal Memo. Once open, all you have to do is tap the button Rec (the red dot) to start recording. When you want to end it, instead, tap the button Stop (the red square).
To access the other functions, once the recording has started, enlarge the black screen by dragging it upwards. This way you will find the buttons Pause (the two lines), Resume e end (on which to tap after finishing). Furthermore, you can modify your registration by replacing a section, cutting it or deleting a part of it.
If you want more information to make the most of the app Voice memos, I suggest you read my guide on how to record audio with iPhone, completely dedicated to the subject.
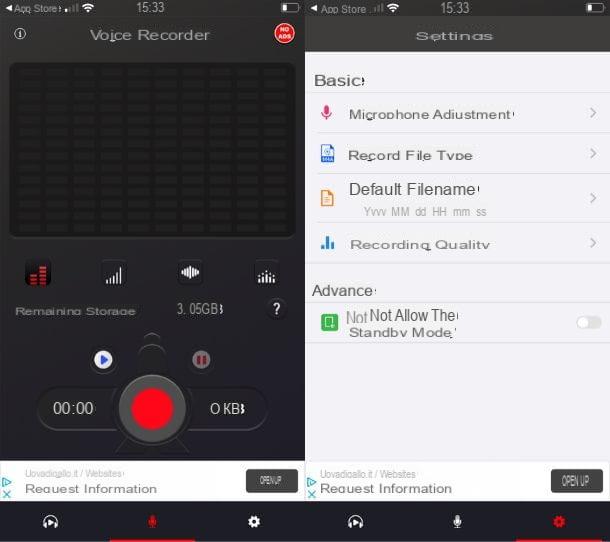
Voice Memos not for you? No problem, there are numerous other apps that you can download from the App Store, such as, Voice Recorder-Voz. Its simple and intuitive interface allows, totally free (but with the presence of advertising), to record audio, save them on the device, edit them and share them on social networks or with your contacts. Give her SettingsFurthermore, you can decide the file format (M4A, AIFF or WAV) and change the Channel from Mono to Stereo.
Starting a recording is very easy. You just have to tap on the app icon and then on the button Rec (the red dot). You can stop it by tapping the button Pause (the two lines) and pick it up again. To stop it permanently, tap the button Stop (the square), rename the file and press on the item OK. From the bottom menu you can see your saved recordings by tapping on the icon with the headphones.
How to record audio on Classroom
You need to I will create an audio in your Google Classroom, the Google platform for online education? I am sorry to inform you that it is not possible to create an audio directly through this platform, but you can still upload audio recorded in another way. In the next paragraphs I will explain how to do it; it is, in fact, an extremely simple procedure that can be carried out in a matter of seconds.
From PC
First, record your audio with the built-in recorder in your PC or via Audacity, following the suggestions I gave you previously.
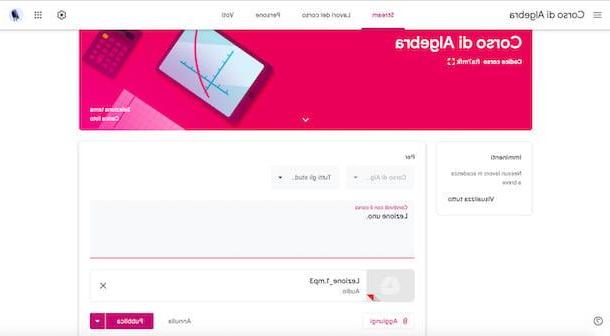
Now all you have to do is access Google Classroom through your browser, select the Corso where you want to insert the audio file and click on the item Share something with the course. Then click on the button Add and select Fillet from the drop-down menu. In the new window, click on the button Select files from device and choose the audio file previously saved on your computer.
Finally, you just have to click on the button Charge and wait for the operation to complete. Once the file is uploaded, add a description and press the button Public.
Give smartphone and tablet
If you act through theGoogle Classroom app for Android or iOS / iPadOS, the procedure you need to perform is very similar to that described above for the PC version of the service.
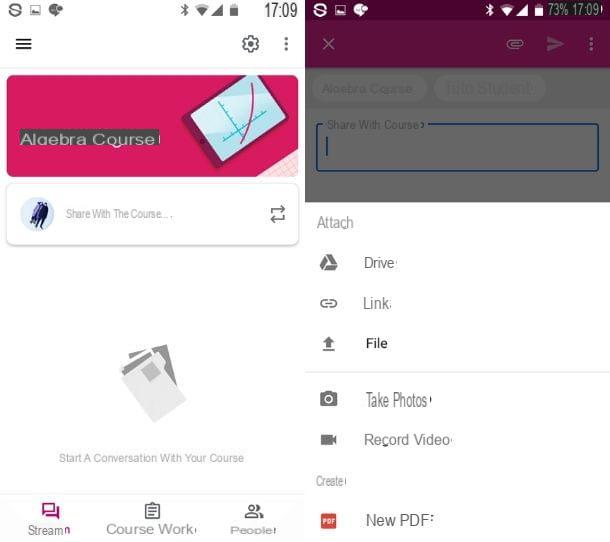
Record the audio through the voice recording app of your device, open the Classroom app, access the Corso on which you want to upload the audio file and tap on the item Share something with the course.
Pray for your pulse Attach (the one in the shape of a paperclip) and select the item Fillet. In the new screen, look for the folder where the file resides. In the case of device Android you can choose between different folders such as Recent o Audio. On iPhoneinstead, you can search between iCloud and saved files directly on the device.
Once you've found the audio, tap on it; wait for the upload, add a description and press the button Send (the one in the shape of an arrow).
How to Record Audio in PowerPoint
Want to use Power point to add audio narration to your presentations? No problem: this is a feature present in the famous Microsoft software, very comfortable and simple to use. Now I'll show you how to use it.
From PC
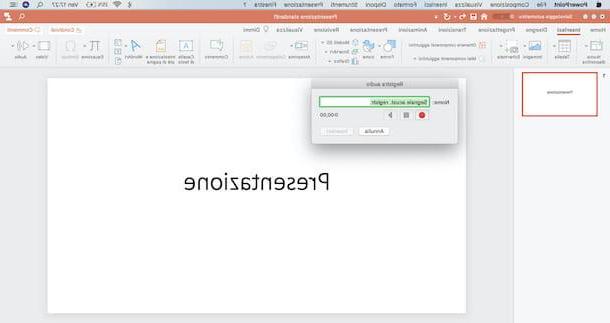
If you prefer to act from PC, first access Microsoft PowerPoint, create a presentation or open an existing one. Now, on the slide where you want to insert an audio, select the item from the top menu Inserisci and click on the button Audio. From the pop-up menu, then select the item Records audio, allow PowerPoint to access the microphone (by clicking the button OK) and, when the called window opens Record Audioclick on your button Rec.
Now you just have to talk and stop the recording by pressing the button Stop when you have finished. Lastly, click on the button Inserisci, to insert your recording on the slide. An image of a speaker will appear, which you can move wherever you want (always within the slide). By clicking on it you can start the audio.
Give smartphone and tablet
Using theMicrosoft PowerPoint app for Android the procedure remains practically unchanged. Access the latter and select an existing presentation or, possibly, create a new one.
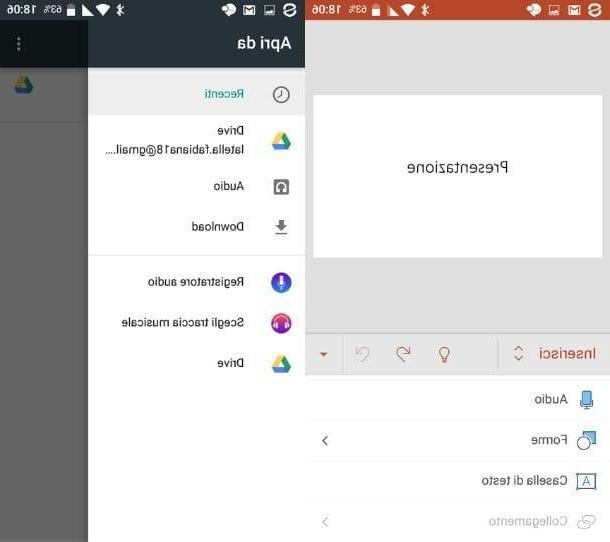
On the slide where you want to insert your audio recording, if you are using a smartphone, tap on arrow (below) and then on the item Home. On a tablet, on the other hand, just select the tab Home present at the top. Then select the item Inserisci to do tap su Audio. At this point, select the recorder app installed on your device and record an audio by pressing on Rec.
Once done, tap the button Stop and save the recording in MP3, WAV o MID / MIDI. Finally, select the audio track to insert and it will be automatically attached to the slide. Unfortunately, the procedure cannot be performed via the Microsoft Power Point app for iPhone i iPad.
How to record audio